How to Compress Images – Reduce File Size Without Losing Quality
Have you ever tried to upload a photo to a website and gotten an error saying the file is too large? Or maybe you have noticed your website takes forever to load because of all the images?
I remember when I first built my own website. I took high-resolution photos with my camera and uploaded them directly. Each photo was about 5MB. My homepage had 10 photos, so the total page size was over 50MB. The site took almost 10 seconds to load on mobile. Nobody waited that long. They left before seeing anything.
After losing visitors for weeks, I finally learned about image compression. I compressed all my images, and the page load time dropped from 10 seconds to 2 seconds. My bounce rate went down, and people actually stayed on my site.
This guide will show you exactly how to compress images without losing quality. I will explain what settings to use, when to use each format, and how to get the smallest file size while keeping your images looking great.
Quick access: Use our free image compressor here
What is Image Compression? Simple Answer
Image compression means making an image file smaller without changing how it looks to the human eye.
Think of it like packing a suitcase. You can fold clothes neatly to fit more in the same space. The clothes are still the same, but they take up less room. Image compression works the same way. The image looks the same, but the file size is much smaller.
Example:
- Original image: 5MB
- After compression: 500KB (90% smaller)
- Visual difference: None (to the human eye)
Why Image Compression Matters
Large images are the number one reason websites load slowly. Here is what I learned from my own experience.
For website owners:
- Faster loading websites rank higher on Google
- Every 1 second delay reduces sales by 7%
- 53% of mobile visitors leave if a site takes over 3 seconds to load
- Smaller images save bandwidth and hosting costs
For email senders:
- Many email providers block large attachments
- Compressed images send faster
- You stay under file size limits
For social media:
- Platforms compress images anyway
- Better to control the compression yourself
- Uploading smaller files is faster
For storage:
- Compressed images take up less space
- You can store more photos on your phone or computer
- Backups are faster and smaller
Types of Image Compression
There are two main types of image compression. Understanding the difference helps you choose the right one.
Lossy Compression
Lossy compression removes some image data to make the file smaller. The data removed is usually things the human eye cannot see anyway.
Best for: Photographs, complex images, gradients Formats: JPEG, WebP File size reduction: 70% to 90% Quality impact: Minimal at good settings
Example: A 5MB photo becomes 400KB. It looks the same to you, but the file is much smaller.
Lossless Compression
Lossless compression reorganizes the image data without removing anything. The image quality stays exactly the same.
Best for: Logos, screenshots, graphics with text, images with transparency Formats: PNG, GIF File size reduction: 10% to 40% Quality impact: None
Example: A 500KB logo becomes 350KB. It looks exactly the same because no data was removed.
How to Choose the Right Image Format
Choosing the right format before compressing saves you time and gives better results.
JPEG (or JPG)
Use JPEG for:
- Photographs
- Images with many colors
- Realistic images
- Gradients and shadows
Why: JPEG uses lossy compression that works very well for photos. A 10MB photo can become 500KB and still look perfect.
Quality setting to use: 75% to 85%
PNG
Use PNG for:
- Logos
- Screenshots
- Text-heavy images
- Images with transparent backgrounds
- Line art and illustrations
Why: PNG uses lossless compression. Text and sharp edges stay crisp. Transparency is preserved.
Quality setting to use: 90% to 100% (lossless)
WebP
Use WebP for:
- Modern websites
- Both photos and graphics
- When you want the smallest possible file size
Why: WebP supports both lossy and lossless compression. It is usually 25% to 35% smaller than JPEG with the same quality.
Quality setting to use: 75% to 85% for lossy, 100% for lossless
How to Compress Images – Step by Step
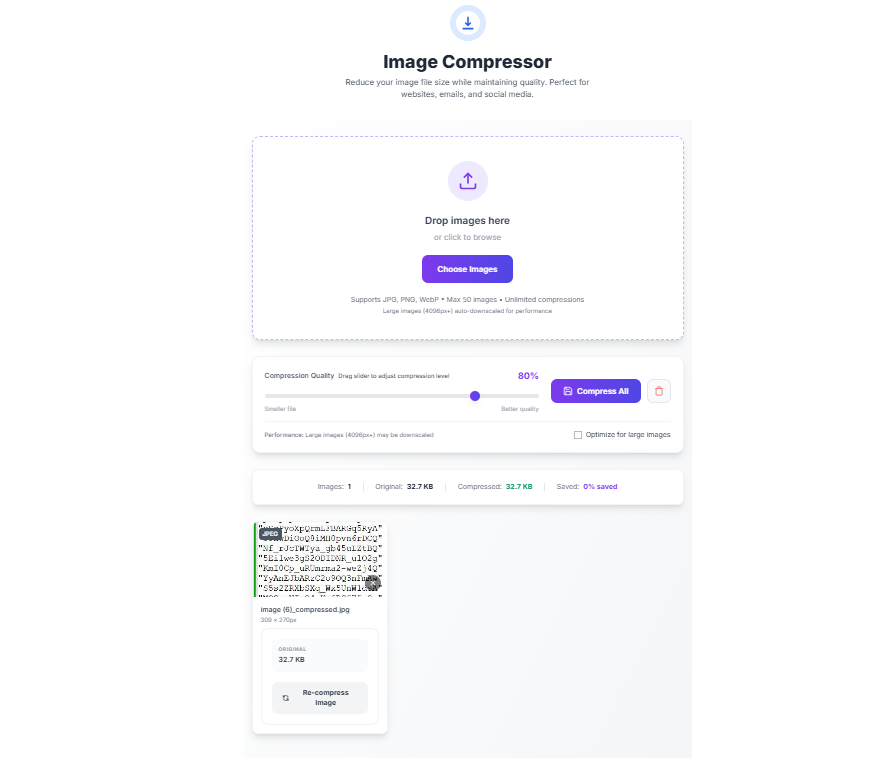
Method 1: Using Our Free Image Compressor (Easiest)
Our image compressor tool makes compression simple.
Step 1: Drag and drop your images into the upload area. You can upload up to 50 images at once.
Step 2: Adjust the quality slider. Start at 80% for photos. For PNG images, start at 95%.
Step 3: Click Compress. The tool shows you the new file size immediately.
Step 4: If the file is still too large, try a lower quality setting. If the image looks bad, increase the quality.
Step 5: Download your compressed images.
That is it. No software to install. No accounts to create. Just upload, compress, download.
Method 2: Manual Compression (For Understanding)
If you want to understand what the tool does, here is how compression works manually.
For JPEG images:
- Open the image in an editing program
- Export or Save As
- Choose JPEG format
- Adjust quality slider to 70% to 85%
- Save and check file size
For PNG images:
- Open the image
- Export or Save As
- Choose PNG format
- Select "Smallest file size" or similar option
- Save and check file size
But doing this for many images takes time. Our tool automates the whole process.
Best Compression Settings for Different Uses
After compressing thousands of images, here are the settings I recommend.
For Website Images
| Image Type | Format | Quality | Max Width |
|---|---|---|---|
| Product photos | JPEG | 80% | 1200px |
| Blog images | JPEG | 75% | 800px |
| Logos | PNG | 95% | 400px |
| Screenshots | PNG | 90% | 800px |
| Background images | JPEG | 70% | 1920px |
For Email Attachments
| Image Type | Format | Quality | Target Size |
|---|---|---|---|
| Any photo | JPEG | 70% | Under 500KB |
| Any graphic | PNG | 90% | Under 200KB |
For Social Media
| Platform | Format | Quality | Dimensions |
|---|---|---|---|
| Instagram feed | JPEG | 85% | 1080x1080px |
| JPEG | 80% | 1200x630px | |
| JPEG | 80% | 1024x512px | |
| JPEG | 80% | 1104x736px |
For Mobile Devices
Mobile screens are smaller, so you do not need huge images.
Recommended mobile settings:
- Max width: 1200px (covers retina displays)
- Quality: 70% to 75%
- Format: JPEG for photos, PNG for graphics
Mobile users will not notice quality differences at 70% because the screen is small.
How to Compress Images Without Losing Quality
The key to compression without visible quality loss is finding the right balance.
Start High, Then Go Lower
Always start at a high quality setting, then slowly reduce until you find the smallest size that still looks good.
My process:
- Start at 85% quality
- Check file size. Is it small enough?
- If not, try 80%
- Still too big? Try 75%
- At 70%, check carefully for blurry areas or artifacts
- If you see problems, go back to 75% or 80%
This trial and error takes minutes but gives perfect results.
What to Look For When Checking Quality
When checking compressed images, look at:
- Edges: Are they sharp or blurry?
- Faces: Do people look normal?
- Text: Is text readable?
- Colors: Do colors look natural?
- Gradients: Can you see banding or steps in smooth areas?
If you see any of these problems, increase the quality setting.
How to Compress PNG Images
PNG compression is different from JPEG because PNG is lossless. You cannot reduce PNG file size as much as JPEG.
When PNG Compression Works Well
PNG compression works best on images with:
- Large areas of solid color
- Simple graphics
- Text
- Sharp edges
When PNG Compression Does Not Work Well
PNG compression does not reduce file size much for:
- Photographs (use JPEG instead)
- Images with many colors
- Gradients and shadows
PNG Compression Settings
For PNG images, use these settings:
- Quality: 90% to 100%
- Method: Lossless only
- Expected reduction: 10% to 40%
If your PNG is still too large after compression, consider converting it to JPEG (if you do not need transparency) or WebP.
How to Compress JPEG Images
JPEG compression is where you get the biggest file size reductions.
JPEG Compression Settings Guide
| Quality | File Size Reduction | Best For |
|---|---|---|
| 90% | 20% to 40% | Professional photography, printing |
| 80% | 50% to 70% | Website product images, portfolios |
| 75% | 60% to 80% | Blog images, social media |
| 70% | 70% to 85% | Email attachments, thumbnails |
| 60% | 80% to 90% | Only for very large batches |
My recommendation: Start at 80% for most photos. Go to 75% if you need smaller files. Never go below 60% for photos you care about.
What JPEG Artifacts Look Like
When JPEG compression is too high, you see:
- Blocky areas, especially around edges
- Blurry text
- Strange patterns in smooth areas
- Colors that look wrong
If you see these, increase the quality setting.
How to Compress WebP Images
WebP is a modern format that gives smaller files than JPEG with the same quality.
Why Use WebP
- 25% to 35% smaller than JPEG
- Supports transparency (like PNG)
- Supports both lossy and lossless compression
- Supported by all modern browsers
WebP Compression Settings
| Quality | Compared to JPEG | Best For |
|---|---|---|
| 85% | Similar to JPEG 90% | High quality photos |
| 80% | Similar to JPEG 85% | Standard website images |
| 75% | Similar to JPEG 80% | Blog images |
| 70% | Similar to JPEG 75% | Thumbnails |
How to Convert Images to WebP
Our image compressor tool can convert your images to WebP. Just upload your JPEG or PNG, select WebP as the output format, and compress.
Real-Life Examples of Image Compression
Example 1: E-commerce Product Photo
Original: 3.2MB JPEG, 2000x2000px Goal: Under 300KB for fast loading
Process:
- Downscale to 1000x1000px (still looks good on product pages)
- Compress at 80% quality
- Result: 280KB
- File size reduction: 91%
- Visual quality: Excellent
Example 2: Blog Header Image
Original: 1.8MB JPEG, 1920x1080px Goal: Under 200KB
Process:
- Keep dimensions (full width header)
- Compress at 75% quality
- Result: 165KB
- File size reduction: 91%
- Visual quality: Very good
Example 3: Logo for Website
Original: 450KB PNG, 800x400px Goal: Under 100KB
Process:
- Downscale to 400x200px (actual display size)
- Compress at 95% quality (lossless)
- Result: 85KB
- File size reduction: 81%
- Visual quality: Identical to original
Batch Compression – Compress Multiple Images at Once
If you have many images to compress, doing them one by one takes forever.
Our tool supports batch compression. You can upload up to 50 images at once and compress them all with the same settings.
When to use batch compression:
- You have a whole folder of product photos
- You are preparing images for a blog post
- You need to compress all images on your website
- You are sending multiple photos by email
How to use batch compression:
- Select all the images you want to compress
- Drag and drop them into the tool
- Set your quality preference
- Click Compress All
- Download all compressed images as a zip file
This saved me hours when I compressed all 500 images on my website.
Common Image Compression Mistakes
Mistake 1: Over-Compressing
Setting quality too low makes images look bad. Pixelated images, blurry text, and strange colors drive visitors away.
Solution: Always check your compressed images before using them. If you see artifacts, increase the quality.
Mistake 2: Using the Wrong Format
Using PNG for photographs gives you huge files. Using JPEG for logos makes edges blurry.
Solution: JPEG for photos. PNG for graphics, logos, and screenshots.
Mistake 3: Not Downscaling
Uploading a 4000px image when it will only be displayed at 800px wastes space.
Solution: Downscale images to the maximum size they will be displayed. Our tool does this automatically.
Mistake 4: Compressing Only Once
The first compression might not be optimal. Maybe you can get a smaller file without quality loss.
Solution: Try multiple compression levels. Start at 85%, then try 80%, then 75%. Pick the smallest that still looks good.
Mistake 5: Forgetting About Mobile
Desktop users have fast internet. Mobile users might be on slow connections.
Solution: Compress for mobile first. If an image loads fast on mobile, it will load instantly on desktop.
How Image Compression Helps SEO
Google considers page speed when ranking websites. Faster websites rank higher.
How compression helps SEO:
- Smaller images load faster
- Faster loading improves Core Web Vitals
- Better Core Web Vitals improve rankings
- Lower bounce rate (people stay on your site)
I saw my Google rankings improve within two weeks of compressing all images on my site.
Frequently Asked Questions
Q: How to compress an image without losing quality?
A: Start at a high quality setting like 85% and slowly reduce until you find the smallest file size that still looks good. For PNG images, use lossless compression at 95% quality.
Q: What is the best free image compressor?
A: Our image compressor tool is completely free, works in your browser, and does not upload your images to any server.
Q: How much can I reduce image file size?
A: JPEG images can be reduced by 70% to 90%. PNG images by 10% to 40%. WebP images by 75% to 90%.
Q: What is the difference between lossy and lossless compression?
A: Lossy removes some data to make files smaller. Lossless reorganizes data without removing anything. Lossy gives smaller files. Lossless keeps exact quality.
Q: Should I compress images before uploading to WordPress?
A: Yes. Compressing before uploading saves server space and speeds up your site. Our tool works great for WordPress images.
Q: How to compress PNG without losing transparency?
A: Use lossless compression at 90% to 100% quality. Our tool preserves transparency automatically.
Q: What is the best quality setting for JPEG?
A: 75% to 85% is the sweet spot. 80% works for most photos. Go to 85% for professional work. Go to 75% for web use.
Q: Can I compress images on my phone?
A: Yes. Our tool works on mobile browsers. You can compress images directly from your phone.
Q: Does compressing images reduce quality?
A: Lossy compression reduces quality slightly, but at good settings (75% to 85%), the difference is not visible to the human eye.
Q: How to compress multiple images at once?
A: Use batch compression. Our tool lets you upload up to 50 images and compress them all with one click.
Q: What is WebP and should I use it?
A: WebP is a modern image format that gives smaller files than JPEG. Yes, you should use it for websites. All modern browsers support it.
Q: How to reduce image size for email?
A: Compress to under 500KB per image. Use JPEG at 70% quality. Most email providers accept files under 25MB total.
Q: Is image compression safe for medical or legal images?
A: Our tool processes images entirely in your browser. Images never leave your device. It is safe for sensitive images.
Q: How often should I compress images on my website?
A: Compress every image before uploading. For existing sites, run a monthly audit and compress any images over 500KB.
Q: Can I compress images for free without signing up?
A: Yes. Our tool is completely free. No signup, no email, no credit card required.
My Final Advice
After compressing thousands of images for my own websites and client projects, here is what I have learned.
Always compress images before uploading to a website. Uncompressed images are the number one cause of slow loading times. A 10-second load time becomes 2 seconds after compression.
Do not be afraid of lossy compression. At 75% to 80% quality, JPEG images look identical to the original to almost everyone. The file size reduction is worth it.
Test different settings. Every image is different. A photo of a landscape compresses differently than a photo of a face. Test and find what works.
Keep originals. Save your original high-resolution images somewhere safe. You might need them later. Only use compressed versions on your website.
Compress before you send. Whether it is email, social media, or messaging apps, compressed images send faster and use less data.
And finally, use a good image compressor. Manual compression takes too long. Our tool does in seconds what would take you minutes per image.
Compress Your Images Now – Free Tool
Have questions about compressing images for a specific use case? Leave a comment below. I try to answer every one.
Tags: image compressor, how to compress images, reduce image file size, free image optimizer, png compressor, jpeg compressor, webp converter, compress jpeg without losing quality, compress png online free, reduce image size for website, image compression tool, optimize images for web, how to make images smaller, image file size reducer, compress photos for email, batch image compressor, compress multiple images at once, best image compression settings, image compression for seo, compress images for wordpress, webp compression tool, lossless image compression, lossy image compression, image compressor free online, reduce png file size, reduce jpeg file size, compress images for mobile, image optimization guide, how to compress images for faster website, image compression best practices